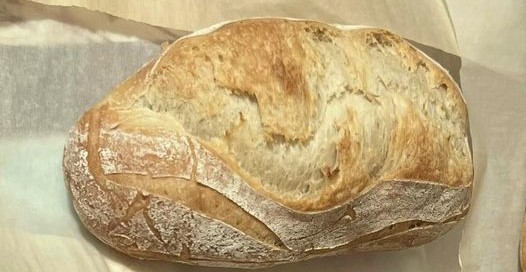
While visiting my sister a few years ago, she baked us a beautiful and delicious loaf of sourdough bread. She talked to me about how she fed it, worked it, folded it; she showed me her whole process. We even peeked in at her “Mother,” a jar of off-white bubbly goo. Then, she tried to convince me to take some starter home with me. I jokingly declined; saying that it sounded like a new puppy would be less work. I left feeling so grateful to her for all the time and energy she put into baking that loaf for us.
Research First
Before taking some of her starter, I needed to do more research first. I needed to know what I was getting into. Over the next few months, I researched everything sourdough and was left exhausted. I felt like I could experiment with sourdough for years and never make a successful loaf. I even talked it through with my husband; we decided to get a puppy instead.
An Unexpected Gift
Eventually, as older sisters do, she showed up on my door step with some starter and tons and tons of patience. Over the next three days, we walked through the steps to make my first loaf of delicious sourdough bread. She was a pour and see, no measurements, go by feel and stickiness kind of sourdough baker. This left my analytical, data driven brain in shambles. How was I going to recreate her “feel” when I was on my own with this living goo?
There are so many good resources out there for how to maintain and make sourdough but I felt like none of them fit my needs or my family’s medium size demand for sourdough. Eventually, I worked out a schedule to create a loaf every three to four days with a limited amount of discard and the option to pause my sourdough making and refrigerate my starter when I needed a break.
Below are my steps to getting started with sourdough starter.
- Create Your Own Starter or Find a Donor: If you would like to make starter on your own, I suggest you head to Little Spoon Farm and check out their tutorial. I love this website and this is a great step-by-step guide. If you have been gifted a starter, yay!
- Get yourself a kitchen scale: We bought the Nutri Fit Digital Food Scale. It is very budget friendly, has multiple units of measure, and is accurate for my home bakery.
- Create a Schedule: Make a schedule that works for you; shoot for every 12 hours, but this is just a guide. I try to feed my starter at 6am and 6pm because that fits best in my schedule but you do you. To this end, I will simple refer to the feedings by AM and PM. I hope this helps!
- Create a Backup: This step is not required but strongly encouraged. Find a clean jar with a lid. Add 20g starter and 30 g water, stir until starter begins to break up. Add 50g bread flour (or whatever you prefer) and mix until there are no dry bits of flour in the mixture, on the bottom, or on the sides of the jar. Put the lid on loosely and let the jar sit out for 2-4 hours (I always set a timer because I forget). Once the timer dings, put the lid on tightly and put the whole jar in the refrigerator. You can leave your starter in the fridge for up to two months without feeding it, I try to feed my starter every month or when I remember. I can post about that next week 🙂
- Day 0: Take a clean jar with a lid and weigh just the jar. I find that helps me to measure the starter over the next few days. In the PM, mix 15g starter with 15g water in a clean jar with a lid. Once the starter starts to breakdown in the water, add 15g of bread flour until there are no dry bits of flour. The starter should have the consistency of a wet boogey (sorry if that is too gross). Put the lid on loosely and let it sit on the counter. I always mix the water in first because I think it creates a better substance for the flour to be added. Really, I don’t think the order matters, again, do what works for you. I do discard starter in my process but I keep the discard in my fridge to make pancakes, crackers, and other yummy treats.
- Day 1: In the AM, mix 20g starter, 20g water, 20g flour in the jar. You should have about 25 g of discard. In the PM, mix 40g starter, 40g water, 40g flour in the jar. You should have about 20g of discard.
- Day 2 (Dough Making Day): In the AM you should have 120g of bubbly, sticky, slightly stinky, starter. Transfer 15g of starter to a new clean jar with a lid and start back at Day 0. Take 98g of starter to make your loaf. You should have about 7g of discard. See how to create the dough in the next blog.
I hope this inspires you to get started! If you have any questions, please email us or connect on Facebook or Instagram!
